Ready to maximize the benefits of feature requests? Follow this guide to setup a feature prioritization matrix and find the trends worth developing.
Creating the best product that your users’ love requires customer feedback. Obtaining feature requests is the best way to obtain the feedback, especially for SaaS companies.
Feature requests and your response to them enhances the user experience and can be the deciding factor of who leads the pack.
In this guide we provide a step-by-step process for creating your own feature prioritization matrix built off of real feature requests and provide five matrix types to help get you going.
What is a feature prioritization matrix?
A feature prioritization matrix is a visual representation of the feature requests you receive. The purpose is to group requests by common terms and concepts. That way you can efficiently identify potential features to create and what features align with your product roadmap.
Benefits of using a feature prioritization matrix
Here's why you should use an auto-generated matrix to help make decisions.
Rely on data - A matrix helps you make more data-driven decisions rather than relying on assumptions, guesses, or objective concerns.
Identify trends - Feature prioritization matrix pulls information from feature requests and groups them based on the terms used in the request. This helps you visually identify common requests and establish business goals.
Efficiency - By automatically pulling repeated words and topics from feature requests and other customer feedback sources, you save an incredible amount of time in identifying what features to build next.
Effective communication - Sharing your feature prioritization matrix can quickly show your customers the popularity of certain requests and why you have chosen them over others.
Improved product delegation - Plotting identified trends on a cost versus benefit axis visualizes quick wins and big projects that hold a lot of value. This allows you to better delegate your resources in the short term and the long term.
Resource optimization - A feature prioritization matrix identifies high-impact features which allows you to optimize the allocation of your resources.
When should you use a feature prioritization matrix?
Feature prioritization matrices are most useful when product teams are receiving a growing number of feature requests and need a structured way to decide what to build next.
Early-stage startups may rely on intuition when the product backlog is small. But as a SaaS product grows, requests begin coming from many directions: customers, sales teams, support tickets, and internal stakeholders.
Without a structured prioritization process, product teams often fall into one of two traps. They either build features requested by the loudest stakeholder, or they chase ideas that seem interesting but don’t align with the product roadmap.
A feature prioritization matrix solves this problem by introducing a repeatable decision framework. Instead of debating opinions, teams can evaluate each request against measurable criteria like user value, business impact, and development effort.
This becomes especially important once your product starts collecting large volumes of user feedback through idea boards or in-app widgets. Consolidating requests and visualizing them in a prioritization matrix makes it far easier to identify patterns and decide which improvements will deliver the most value.
Feature prioritization matrix example
Imagine a SaaS company building a project management platform. Over the past month, customers have submitted several feature requests through their feedback board.
The most popular requests include dark mode, Slack notifications, advanced reporting, and custom dashboards.
At first glance, all of these ideas sound valuable. However, the product team has limited development capacity and must decide which features to build first.
To solve this, they evaluate each request using a value versus effort prioritization matrix.

Dark mode receives a moderate value score but requires very little development effort. Slack notifications have strong demand but require moderate engineering work. Advanced reporting has very high value for enterprise users but requires a significant engineering investment.
Once the features are plotted on the matrix, the team can clearly see which ones fall into the “quick wins” category and which ones are longer-term roadmap initiatives.
This visual approach removes much of the subjectivity from product decision-making. Instead of debating opinions, teams can focus on delivering the features that generate the most impact relative to the resources required to build them.
Automated versus manual matrixes
Feature prioritization frameworks can be manually created through Excel or other spreadsheet software. While this time-consuming method works, it may not be the best use of your time or resources—especially when the requests start piling up.
Another option is to use software like Frill to auto-generate them. The software provides the tools and resources to obtain the feedback requests and establish your product prioritization framework and plot the prioritization matrix of features grouped by key terms (more on this later). That way you can spend more time on product strategy.
How to create a feature prioritization matrix with real feature requests
Ready to collect real feature requests and create your own feature prioritization matrix.
Here's how:
Step 1. Create your feature request board
The first step in the process is to create a feature request board to collect requests. Like most things, you can build your own or utilize existing software.
If you go the existing software route then here’s a list of feature request tools you can choose from. Be sure to select a software that is super easy to use and requires a sign-on process. The sign-on process will allow you to see who is asking for what. And the easier it is to use the more requests you will receive.
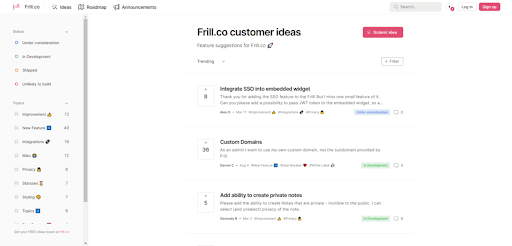
We recommend using Frill’s feature request board. It has amazing UX and is super easy to use.

Step 2. Add an in-app widget
After setting up your feature request board, the next step is to add a widget to your web app. An in-app widget brings the feature request tool to your clients. This will boost awareness and make it simple and convenient for requests to be submitted.
With Frill we provide an in-app Widget Builder and easy-to-follow walkthrough for building your widget code with and without single sign on (SSO) .

Step 3. Start promoting your new feature request system
Getting the most out of your feature request matrix requires a lot of requests. To get those requests, start promoting the new feature request system. Some promotion ideas include:
Add a button to your announcement page
Send a one-time email blast announcing the new feature request system
Post on social media
Write a blog
Step 4. Prioritize submitted feature requests
Prioritization of incoming feature requests is incredibly important. Make sure you are ready to start prioritizing new requests as they come in. Include your product teams in the process and make sure you keep your product vision in mind.
There are many methods you can use to prioritize requests (more on that later). When deciding on a methodology, you’ll definitely want to keep your roadmap or current sprints in mind.
Frill provides a simple straightforward way to set up your prioritization. The process is broken into benefit and cost factors. Within the two categories, you can add different sub-factors you want to consider and give them individual weights. Then when you select a feature request on the request board you can directly assign the priority values of your defined factors to that request.

Step 5. Plot feature requests
With your feature requests in and prioritization values set, it is time to visualize all the requests by plotting the results in the prioritization matrix.
In Frill, this is easily done by selecting the “Prioritization Matrix” tab on your dashboard.

5 types of feature prioritization matrices
Creating automated prioritization matrices involves setting up and ranking the benefits and cost factors. Once those are established, it is all about prioritizing requests (Step 4) and plotting the matrix (Step 5).
Before setting up your prioritization metrics, establish the rating type you intend to use and consider the ideal conditions for a maximum and minimum rating of each factor. This will help maintain consistency.

Here are some popular frameworks for feature prioritization matrices and the steps to set them up:
1. RICE matrix
The RICE method is a prioritization framework developed by Intercom. It divides feature request ratings into four components:
Reach - how many users will benefit from this feature?
Impact - what is the level of impact this feature will have?
Confidence - how confident are you in who will use it and how important it will be?
Effort - how much time and resources are needed to implement this new feature?
The objective of the RICE framework is to balance value and effort. It can also be automated in Frill.
Steps to create the RICE matrix:
Add benefit factors - Under the prioritization tab (see Step 4 above) create three benefit factors: Reach, impact, confidence. It is also recommended to include votes as well.
Set benefit rating types - For reach and confidence percentage is a good rating type. Impact can intuitively be referenced as a scale, say 0-10. Votes are just vote count.
Set benefit factor weights - Set the weights to 100% for reach, impact, and confidence. You may want to play with the weight of the votes, but 20% is a good starting point.
Add cost factors - Add effort to the cost factors.
Set cost rating types - Typically effort is rated on a scale.
Set cost factor weights - Set effort weight to 100%.
Prioritize feature requests - In the ideas tab select each request and set the priority values.
View matrix - Select the Prioritization Matrix on your dashboard.
2. Value vs effort
The value vs. effort is a simplified version of the RICE framework. Here you are lumping all the benefit attributes into a single value. This method can speed up the prioritization process as you are only rating two factors for each request. Be sure to have a clear methodology though as it is easy to incorporate bais without being aware.
Steps to create the value vs. effort matrix:
Add benefit factors - Create two benefit factors: value and votes.
Set benefit rating types - A scale is a good choice for value. Use vote count for votes.
Set benefit factor weights - Set the value weight to 100%. Start the weight of the votes at 20%.
Add cost factors - Add effort as the cost factor.
Set cost rating types - Rate effort on a scale.
Set cost factor weights - Set effort weight to 100%.
Prioritize feature requests - In the ideas tab select each request and set the priority values.
View matrix - Select the Prioritization Matrix on your dashboard.
3. MoSCoW model
The MoSCoW method is a manual method that breaks the factors into Must, Should, Could, Won’t. This matrix framework is best suited for product managers and executives.
Steps to create the MoSCoW matrix:
Create matrix quadrants - Divide your whiteboard into a grid of four squares.
Create sticky notes - Make each feature request into a sticky note.
Place notes - Place and adjust the sticky notes into the four categories. It is recommended to share and collaborate on where features are placed.
4. Urgent vs Important
Urgent vs. important matrix method for opportunity scoring. Here the matrix quadrants can be divided into Do, Schedule, Delegate, Eliminate.
While not directly represented in Frill, translations can be made to the prioritization matrix to utilize this method. This will allow you to take advantage of our automated features for efficient visualizations.
Steps to create the urgent vs. important matrix:
Add benefit factors - Add importance as a benefit factor. Don’t forget to include votes as well.
Set benefit rating types - Use a scale for importance.
Set benefit factor weights - Set the importance weight to 100%. Start the votes weight at 20%.
Add cost factors - Add Urgent as the cost factor.
Set cost rating types - Rate effort on a scale with lower values being more urgent (i.e. 0 = urgent)
Set cost factor weights - Set urgent weight to 100%.
Prioritize feature requests - In the ideas tab select each request and set the important and urgent values.
View matrix - Select the Prioritization Matrix on your dashboard. Make notes that benefit equals importance and cost represents urgency.
5. Weighted scoring
The weighted scoring matrix is a custom matrix that follows the standard benefits versus costs methodology. Here, you decide the rating categories and their associated weights. They can be benefits or costs, and you can allocate the weights depending on the company's priorities or resources.
With Frill, weighted scoring is simple to implement and automate.
Steps to create the weighted scoring matrix:
Add benefit factors - Add your custom benefit factors. Don’t forget to include votes as well.
Set benefit rating types - Set your defined benefit rating types.
Set benefit factor weights - Set the custom benefit weights.
Add cost factors - Add your custom cost factors.
Set cost rating types - Set your defined cost rating types.
Set cost factor weights - Set the custom cost weights.
Prioritize feature requests - In the ideas tab select each request and set the values.
View matrix - Select the Prioritization Matrix on your dashboard.
How to choose the right prioritization framework
Not every feature prioritization framework works for every product team. The best framework for your organization depends on several factors, including your product maturity, the amount of data available, and the complexity of your roadmap.
If your team needs to make quick prioritization decisions, a simple value versus effort matrix is often the best place to start. It requires minimal scoring and allows teams to quickly identify low-effort features that deliver immediate value.
For teams that have more detailed product analytics and customer research available, frameworks like RICE provide a more data-driven approach. By evaluating reach, impact, confidence, and effort, product managers can prioritize initiatives based on measurable outcomes rather than intuition.
Larger organizations with multiple stakeholders often benefit from weighted scoring models. These frameworks allow teams to assign different weights to factors like revenue impact, customer satisfaction, or strategic alignment.
Ultimately, the goal is not to find the “perfect” framework. The goal is to create a consistent prioritization process that helps your team make better product decisions over time.
How to capture more feature requests from users
Before teams can prioritize features, they need a reliable way to collect and organize feature requests.
For most SaaS companies, requests come from a variety of sources. Customers may submit suggestions through support tickets, sales conversations, surveys, or community forums. Internal teams often contribute ideas as well, particularly from sales or customer success teams who regularly interact with users.
The challenge is that feedback scattered across multiple tools becomes difficult to analyze. Product teams may miss trends or build features based on incomplete information.
Centralizing feature requests in a single feedback system helps solve this problem. When all ideas are collected in one place, product managers can more easily identify recurring themes and determine which requests are gaining the most traction with customers.
This centralized approach also allows users to vote on ideas and add comments, giving product teams additional context about how important each feature is to their customer base.
Once requests are organized, they can be evaluated using prioritization frameworks and visualized within a feature prioritization matrix.
Common feature prioritization mistakes
Even with a feature prioritization matrix in place, product teams can still run into common pitfalls that reduce the effectiveness of their prioritization process. Many of these mistakes occur when teams rely too heavily on a single input or fail to maintain a consistent framework for evaluating ideas. Being aware of these challenges can help ensure your prioritization matrix remains a reliable decision-making tool.
Prioritizing features based only on customer requests. Customer feedback is extremely valuable, but it shouldn’t be the only factor guiding product decisions. Some requests reflect short-term preferences rather than long-term product value. Combine feedback with analytics, product vision, and business goals to determine which ideas truly deserve priority.
Underestimating development effort. A feature that appears simple on the surface may require significant engineering work behind the scenes. Infrastructure changes, integrations, and testing requirements can drastically increase the time needed to deliver a feature.
Failing to revisit prioritization regularly. Product priorities evolve as new feedback arrives and market conditions change. Teams should periodically review and update their prioritization matrix to ensure it reflects current user needs.
Overcomplicating the prioritization framework. If scoring systems become overly complex, teams may stop using them altogether. Effective frameworks strike a balance between structure and simplicity so decisions remain consistent without slowing development.
How prioritized features become a product roadmap
Once features have been evaluated and plotted on a prioritization matrix, the next step is translating those insights into a clear and actionable product roadmap.
Moving high-value features into the next sprint
Features that score highly for customer value but require relatively low development effort are often prioritized for upcoming sprint cycles. These “quick win” features allow teams to deliver meaningful improvements to users quickly while maintaining development momentum.
Scheduling larger initiatives
Some features may provide significant value but require more engineering time, research, or infrastructure changes. These initiatives are typically placed later on the roadmap and scheduled across future quarters or releases. Planning ahead for larger features ensures that teams can allocate the necessary resources without disrupting current development cycles.
Aligning the roadmap with product strategy
Using a prioritization matrix as the foundation for roadmap planning helps ensure that development decisions remain aligned with the broader product vision. By evaluating each idea against measurable criteria, product managers can balance customer requests with long-term business goals.
Communicating the roadmap to customers
Many SaaS companies share parts of their roadmap publicly or announce upcoming features to keep users informed. This transparency helps customers see how their feedback influences product development and encourages continued engagement with the feedback process.
With Frill, you can automatically generate a feature prioritization matrix based on real user feedback. Get started today.

Dayana Mayfield
Dayana Mayfield is a B2B SaaS copywriter who believes in the power of content marketing and a good smoothie. She lives in Northern California.